Showing posts with label tips n tricks. Show all posts

Tuesday, May 14, 2013

Is this thing still on?

Wow... take a few days off to move and get settled and pretty soon nearly a year has gone by without a post!  Time to remedy that.  So here is a post.

We moved to far south Huntsville, long story.  Larger house to accommodate my father.. and much larger lot.  I'll be posting pictures, before and afters, but thought I would just break the ice now with a little post on saving seed.

Don't do what I've done :)

First, the part I did right!


well sort of...

Please welcome the Bonita Brassica!   This plant is the result of saving seed when the Napa cabbage, kale and collards were blooming and setting seed all at the same time in a small garden.  That was in the early summer of 2011... I planted the seeds in March and they are, as you can see, not like any of the above listed plants.  The leaves are thicker than Chinese cabbage, but rather like a very young collard, not leathery or stiff.  They actually look rather like choi on the bottom, tho they are green and not white.  Now, they may have some choi in them since there was choi blooming in the back yard at the time, who knows.  These are mature plants, since they are already setting seed with the hot weather last week.

The taste is not to die for...rather tasteless actually.  BUT... it is a 'new' plant.. one I shall now mercifully not grow again :)   I knew I would not be getting anything 'pure' out of the saved seeds, but it was interesting to see how the plants crossed up.

So, if you are saving seed..start with a good 'heirloom' seed, try to make sure that nothing in the same family is growing anywhere close (see a good seed saving book for distances) and take notes on how and what you saved.  Make sure you dry and store the seed correctly ( you might try this book, or this one) and grow it out.

As for what really not to do... Do not get frazzled with moving and snatch seed setting lettuce stalks and shove them in a jar.  Well.. you can, as I did.   I grabbed these last summer as we were moving rather quickly.. our house sold before it went on the market (yeah!) but we left a lot of dirt and 'stuff' behind that we are missing now (boo!).


I know that this is lettuce.. and I HOPE it is a red lettuce that we particularly liked.  But I won't know until I plant it and since I just found it under the bed (that isn't where you keep your seed stash?) I will have to plant a little now and a little this fall.  The cool spring gives me hope that I can sneak some in before the bolting season begins.  Label your seed when you store it, you will not remember, even if it was the only lettuce growing in the front yard.

A note:  lettuce 'flower'/seedheads are rather like dandelions.  If you are saving seed while the plant is still alive, wait until the seedhead is really fluffed before harvesting, the immature seedheads look a bit like a paintbrush and do not 'ripen' after being removed from the plant.

gosh.. that wasn't so bad.  Ice broken, posts to follow :)

GV

Wednesday, June 20, 2012

Great Resource!

Check out DIY Pest Control at Homegrown.org!   I can't wait to find some great new ideas here, they've really made it easy to use.

Check out the comments also :)

GV

Sunday, June 12, 2011

Potato Boxes

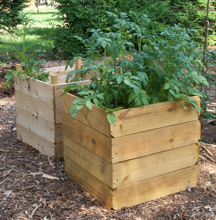
Space is at a premium here in our micro suburban homestead. We love growing potatoes particularly in leaves and soft materials. This year we decided to go vertical. Gentlevoice found some plans for potato boxes online and of course I modified them just a little.

Using fencing boards and 2” x 2”s, the original plan called for the 2” x 2's to be 4' long in each corner. I did not want to look at that sticking up for weeks on end, and I consider the stubs to be safety hazards, so I cobbled together these frames. I offset the 2” x 2”s to allow for stacking. Each 2” x 2” is the 6” long and offsets to the board by 3 “.

I set potatoes on the ground and covered them to the top of the 1st board with soil and leaves.

Stubs up at the back,
down in the front,
doesn't it look better?
As the plants reach 12” in height I cover ½ of the stem. It took 3 weeks before I needed to add a level to hold the additional mulch. However I needed to add the next level the very next week. This setup is 5 weeks old; I was very late getting to this.
There are claims that it is possible to grow up to 100 lbs of potatoes in this set up. We will not come close to that this year for several reasons. First, the late start cost me precious growing time. Second, I chose a German ButterBall potato which is very small; this potato weighs a few ounces, nowhere close to an Irish or other larger growing variety. Lastly I think I have made a mistake. I used leaf mold enriched with manure instead of just leaves with the last “fill up”. Not a best practice for several reasons. I may have heated the pile with compost instead of simply providing a growing medium. One of the stacks has wilted in the last few days, whether it is blight or I overheated the stack remains to be seen.

Time for at least one more box,
maybe after the worst of the afternoon heat!
I held off on this project for several years because it just did not seem cost efficient. These stacks of boxes cost $ 12 -15 each for materials. You can buy a lot of potatoes for $15. However I hope these will last several years possibly, much longer. I also like the idea of another place to compost in place or store leaves.


We will update this when we harvest the remaining plants. If it doesn't work this time we will try again this fall or next spring. Again at worst we have made compost at best we have a space saving technique for growing taters.

Sunday, June 5, 2011

Tomato Tips

               Many folks know that the deeper you plant a tomato the better. The plants develop a much stronger root system off of the stem. Once the plants have settled in and begun to grow, here a few tips that can save time and expense.

Quick Pruning Lesson
2 suckers going and one low branch gone

            Once the tomato is growing nicely, raise the canopy or remove any branch that (with further growth) will make contact with the soil. Many disease issues with tomatoes start with the lowest branches. Disease on most plants is spread by water splashing on the foliage and yes, diseases can spread upwards.
             This is also a good time to pinch out the first suckers the plant is trying to grow. The sucker is the new, vigorous growth that starts between the stem and the older branch or lead. Suckers are primarily vegetative and fruit production is limited when these are allowed to stay. You can root these suckers and start new plants to give you a Fall to Christmas crop of tomatoes.


Water Wisely

We know that many diseases are spread by water splash so let's minimize the opportunity for that to happen. Consider using black round soaker hose or one of the new pressure compensating drip hoses along the row next to the tomato stalk, preferably not touching but very close. Coat hanger or light wire can be bent in a deep U to hold down the hose.

Soaker hoses and Onion scapes to deter pests

Mulch and Cage

       Tomatoes love mulch and mulch cuts down on water loss, weeds and helps keep the roots cool. We like to start with newspaper for weed control. I keep it simple and use whole sections. Two layers equaling 8 sheets of newspaper works really well. Leave a small open square around the stem for watering/fertilizing or lay the paper on top of the drip hose. We top this off with natural mulch or leaves for cosmetic purpose although both materials will work by themselves. Apply your granular fertilizer before mulching. After mulching you can use a liquid product such as fish emulsion or you can siphon in your favorite fertilizer through the soaker hoses.

           Many of the tomatoes we grow are trellised using the Florida Weave, but we are caging this group. We prefer concrete reinforcing wire; it is strong, lasts for years and won’t bend in the middle like so many light wire cages. Many of the varieties we grow can reach 14' + in length so we stake each cage as well ,I prefer rebar because it lasts and can be tapped in to the ground if needed, but wooden / bamboo stakes work just fine.
The plants grow up and out of the cage and then back down and start to run. Pruning can be helpful to a tomato plant, particularly thinning and judicious heading back in mid to late summer. Careful, don't prune too much too quickly at that time or you will scald the plants. Frankly I am so busy at that time of year we don't prune the plants unless they break a limb or I am trying to stop a disease issue. It’s a good idea to sterilize your pruners between cuts.


 It is the first week of June and unseasonably hot. Thrips, aphids and some leaf diseases are starting to show up. Be sure to look on the undersides of the foliage for insects. Leaf curl is often an indicator of their presence. If you must spray do so in the cool just before dark or early in the morning. Try to avoid spraying foliage during the heat of the day with these high temperatures. Of course use the least toxic material, labeled for use on vegetables and follow all label directions.
                Water deeply but infrequently. Trying to water a little every day is futile and can be harmful to the plants. Apply 1” – 1.5” of water a week where possible. Consistent soil moisture is a big key to consistent fruit quality.


Tuesday, March 15, 2011

A lot going on...

Warmer weather means it's the last chance to get the cool season crops in and out before hot weather, so we planted out some of the beds that we've cleaned out or left fallow over the winter. 
The bed numbers correspond to the layout on Garden Beds page. if you want to follow along!
Right now, we have


Enough for 2 people all season!
  Collards in Bed 3 (pictured)- we've eaten off these all winter and they are still going strong.  Next time you have fresh ones, saute in olive oil with some garlic and onion...and seasoned salt (the miracle seasoning)  They'll stay until they start to bolt.
Bunching onions in Bed 4 - which are just starting to bulb out and will come out soon
Red Russian Kale in Bed 8 - again, staying until it's time is past, giving us a "mess" every other week or so. This bed also had some cabbages, which are now eaten...so I threw some cilantro seed into the bare half of the bed.
Various herbs in Bed 12 - parsely, thyme, sage, garlic and a couple of struggling lavender which The Master Pruner pruned rather harshly, but I am assured it will be happer for it.
Bed 9 has a couple of Chinese cabbage plants that I'm going to save seed from.  The brassicas put on a very pretty early spring show of yellow flowers!
On to new plantings....
Bed 10 - The carrots ran out a couple of weeks ago, so that bed got some Tendergreen mustard, Bibb lettuce and radishes for quick salads in 2-3 weeks.
Bed 11 -  Spinach followed beets here, so they'll be ready for thinning to add to the salad soon.
Bed 5 -  This bed is a no-till/mulch/pile it on bed and got it's first seeds... Multicolor Chard.  I only planted the outside few feet closest to the driveway, I'm hoping it will look pretty since it can last quite a while into summer.  We can plant something not quite so attractive 'inside'.
Bed 6 - I'm trying some Giant Red Mustard here...it's coming up slowly
Steel rod to firm soil and make seeding rows,
just press, then plant!
Bed 7 - Detroit Red beets - More thinnings for salads and then there should be enough in the bed to warrant a canning session or two.  After we eat fresh ones, of course. 
Along the front fence, the peas are growing quickly, I just hope it doesn't warm up too soon.  I got them in a little late this year.  I think from now on, I will sow in the fall and let them hibernate at 2" tall like they did last year, that was my best pea crop ever.

In the back yard, I set out some tranplants of red cabbage, Joi choi,  Chinese cabbage and a flat early dutch or two.  I have some Napas of two varieties in flats, but one was almost a total failure, while the other is up and going in 48 of 50 cells.  No clue what happened, I planted them the same day, same soil mix.  Isn't gardening fun?

How's your spring going?
GentleVoice

Thursday, February 24, 2011

Crop Rotation

There are many reasons to rotate your crops each year. Rotation is primarily used to minimize nutrient depletion in the soil and manage insect and disease pressures on your plants. Properly planned and executed, rotation can enhance and help the gardener build soils and maximize crop yields over the years. Most folks recognize that planting the same type of plant in an area year after year can cause problems. The Cooperative Extension System tells us it is best to avoid planting any member of the same plant family in the same spot or row for at least 2 years.

Below are 3 different rotation plans

The first plan shown is from ACES publication ANR-1254 Planting and Maintaining Rotation by Plant Family

Alliaceae (Onion Family)  Onion, garlic, leek, shallot, chive

Apiaceae (Carrot Family)  Carrot, parsnip, parsley, celery

Asteraceae (Sunflower Family)  Lettuce, endive, salsify, Jerusalem artichoke

Brassicaceae (Mustard Family)  Cabbage, broccoli, cauliflower, Brussels sprouts, kohlrabi, turnip, Chinese cabbage, kale, collards, mustard greens, radish, rutabaga

Chenopodiaceae (Goosefoot Family)  Beet, Swiss chard, spinach

Convolvulaceae (Bindweed Family)  Sweetpotato

Cucurbitaceae (Gourd Family)  Cucumber, muskmelon, watermelon, summer squash, winter squash, pumpkin, gourd, honeydew melon

Fabaceae (Pea Family) English pea, snap bean, lima bean, soybean, cowpea, field pea

Malvaceae (Mallow Family)  Okra

Poaceae (Grass Family)  Sweet corn, popcorn, ornamental corn

Solanaceae (Nightshade Family)  Tomato, pepper, eggplant, Irish potato, husk tomato

Grouping plants in a row or plot by family will keep things simple IF you write down your plan each year. By reviewing last years layout in the cold wet days of January and February you can have a new plan for the year by simply moving everything over one row etc. The authors are not saying this is the rotation order. This is simply an alphabetical listing of the plant families and the most commonly grown crops within those families. To help you avoid inadvertently planting crops within the same family on the ground two years in a row.

Many smaller gardens with space considerations may want to utilize this 4 year rotation.

Leaf crops, followed by
Fruit crops, followed by
Root crops, followed by
Legumes, repeat the cycle

Here is the rotation we use where possible. Rotation is accomplished by moving the plants over one row, plot or field each year.

Corn: Follows Cabbages and Brassica's

Potatoes: Early and late Potatoes benefit from corn grown the previous year. Many crops do not like to follow corn. We grow our potatoes in mounded leaves which builds a better soil for succeeding years. Weeds can be an issue in the tater patch.

Squashes: A cleaning crop, helps reduce weed problems in the root crops. Those big leaves shade the soil.

Root crops: Hardest crops to keep weed free, although proper mulching can alleviate much of this problem. We combine Beets and Carrots here even though they are in two different families. Turnips, Rutabaga, Radishes all go in this “Root” area.

Beans: Beans don't like following beets but can go after other root crops. Cut off the stems and leave the roots of the beans in the ground. Beans are legumes and fix nitrogen which is almost always needed in our soils.

Tomatoes: Follow beans, keep away from potatoes as many years as possible. Both are in the nightshade family.

Peas: Can be planted as a green manure crop to boost the Brassica's. Although I am not recommending three successive pea crops on the same ground in one year, Austrian Pea's can be used as a soil builder over the late fall and winter. Early peas planted in February will add nitrogen for a follow on crop and pea production can be considered a bonus with our up and down temperature swings in the spring. Summer pea's may be the most dependable producers in our area they also add nitrogen to the soil, if you leave the roots in the ground. All are excellent at attracting pollinators and beneficial insects in the garden as well. The type of pea and timing of your planting should be dependent on which type pea you like best or the follow on crop your plan calls for next.

Cabbages or Brassica's: Hard on the soil, taking lots of nutrients, however these are known as dynamic accumulators. Be sure and compost all unused portions of these plants.
Repeat

Rotation combined with companion planting and cover crops can help build your soil, and improve your garden and its productivity. While we will not be covering these subjects in more detail in this article, begin to think in terms of : What does this plant need, add to, or take from the soil. What cover or nurse crop can I plant to provide these minerals and nutrients for this crop, or the crop to follow.

Remember to keep your soil covered at all times. Either with the current crop, a cover crop, or a mulch.

Sunday, February 6, 2011

Cheap? Repurpose? Grow Food!!

We at Foodscapes will be happy to create a more elegant solution to your 4 season issues. The following are some quick, easy and relatively inexpensive solutions for seed starting and row covers for young tender plants. These season extension tools can help you put food on the table earlier in the year and farther into the winter.

This is our bed bed. This is a re-purposed frame from one of those high dollar air beds. We made a lasagna garden out of it last year or the year before, I forget now.

The arches are 1/2” conduit bent to a 4' diameter. The conduit comes 10' long and runs around $2.20 per stick.


The rope that is somewhat carelessly tied to the arches is to hold the plastic up to allow better access when working with the flats or transplants in the ground as the case may be. I am using clothes pins to hold the plastic up and out of the way.


This plastic is the good stuff. 6 mil UV treated clear greenhouse grade plastic 10' wide x 100' long before being cut to length for this project. I caught this on sale last fall. It is rated for 4 years of continuous service. We will only use it on a seasonal basis so hopefully it will last many, many years. Please note for 6 years we have used a good grade of contractor plastic which costs much less. We usually get 2 years of service out of the contractor plastic. By keeping the unused portions out of the sun, a roll can last a long time. The contractor plastic is opaque and does block more sun but again it is an inexpensive way to cheat the seasons.

The bed was already in place but needed weeding. I placed the bent conduit arches in on each side and pushed them in to the soil about 6” - 8” or so. In a longer run or row set up I could add a purling made from conduit and fastened with self tapping screws. There simply is no need for that with such a small structure. I measured twice and cut the plastic, draped it over and looked around for hold downs (sand bags, pots, bricks and a landscape timber). I purposely chose these materials to show this doesn't have to cost an arm and a leg to do. Sod staples, tent pegs would also work well. With a wood sided frame some cardboard or batten material and a staple gun could hold one or two sides.

The rope that is somewhat carelessly tied to the arches is to hold the plastic up to allow better access when working with the flats or transplants in the ground as the case may be. I am using clothes pins to hold the plastic up and out of the way.

The plastic teepee.


Here are some pictures from our early square foot gardens. I simply bought some ¾” plastic pipe cut it to fit inside the boxes. By placing the ends in the corners I avoided the need for brackets. Brackets can be bought or are easily made we chose to do without. We crossed the pipes and tied them together in the center and they lasted all winter. We used this technique with these beds for 3 or 4 years before the beds moved to another house to help our son get started gardening.We used the contractor grade plastic and dreamed of the good stuff, all the while cheating the seasons with early started vegetables.

Tuesday, January 11, 2011

Planning Time--Planning this years garden

Location, Location, Location,


Avoid planting near or under trees. Start by looking for an area or space that receives at least 6 hours of sun. 8 hours of direct sun or even more is ideal. The Summer crops or Fruit producers like squash and tomatoes need at least that much light to really perform close to their ideal yield. For Leafy crops, early spring and mid spring produce, we can get by with partial shade or 6 hours of sunlight. As we move into late spring early summer, we use the shaded portions of our property to increase the growing period for lettuces and greens, often into June.

All the books say to locate your garden in a fertile, well drained location. Here in Alabama unless you have already composted in place over the area that will be this years garden you probably have an infertile area. With our highly compacted urban soils many sites are poorly drained as well. Which is why raised beds are so useful to the gardener compared to the farmer. Try to choose a relatively level area. A south facing slope warms faster in the spring and receives a little more light each day.

An additional consideration is access to water. Try to place your garden near a water source.

One thought that is usually missed in these generic discussions is too look for what your site can grow well. If shade is an issue then you may be blessed to grow greens longer into the growing season. If shade is an issue, think in terms of shade tolerant, even shade loving, plants. Learning the “genius” of your site is a big part of understanding the puzzle. Learning to build soil whether in heavy clay or sand is actually the real challenge. Putting as many factors as possible on your side certainly makes gardening more fun, productive and ultimately less expensive.

We will improve the soil - over time. Start with a soil test for the potential area. Boxes are available at the Cooperative Extension Service office near you. You can pick up the appropriate form at the office as well or you can go to Home Soil Tests for complete instructions and save yourself a trip the Extension office.

Next comes the fun part, List your favorite vegetables. Identify the vegetables you really love to eat, or have difficulty finding in the stores. See our list for a memory prompt and ideas.

You can plan for the entire year,( recommended ) or you can plan what you are going to start with, over the next few weeks. Here's how we graph our gardens. Graphing your potential area really makes a difference in maximizing potential yield and minimizing maintenance related issues. To start out use a different sheet of graph paper for each season of the year. It will be much easier to keep up with.

Start Small. Gardening is much more enjoyable if you aren't overwhelmed. Master a small space or spaces, learn to grow a few plants really well and expand the garden a little each succeeding year until the garden is just right for you. One advantage to expanding each year is the opportunity to compost in place where next years addition will be. Building the soil in advance is a great way to improve yields.

Sunday, January 3, 2010

4 Season Gardening?

Is "arctic" a season?   19 degrees and colder this week....time to work quickly on what little there is to do outside!
We'll cut and pull what we can, there's always canning or freezing.  Not a good time to set out little seedlings, we'll just start some new ones for the next round as what I have ready is getting leggy.  That's the good thing about starting seeds in pots.  No backbreaking bending over to see if that peek of green is a seedling or a weed.  Little wasted seed (I always overplant in the beds). 
Seed starter pots and homemade seed tape...the keys to properly spaced plants!

Back to the fire,
GentleVoice