Showing posts with label container gardening. Show all posts

Sunday, February 19, 2012

Garden Tour

So we are driving aound a bit looking for a potential new customer's yard and what did we find tucked into downtown spaces?
Boxes for square foot gardening and neatly stacked urbanite for future use?


Nice neat beds with lovely mulch just waiting for planting!
Then around the corner... those are young fruit trees, a lot of edible plants could be grown between them for several years.


Up through town to the area where the customer lives, and up the alleys around Oakwood Avenue.


Neighbors - Growing Together

I know we often have WAY too many green peppers for our own use, even after we've pickled/salsaed/frozen what we'll use through the winter, not everyone in the neighborhood needs to grow them.  While the planning is gearing up this spring, talk to your growing neighbors and plan a little so that more varieties of vegetables can be grown.

Sunday, September 18, 2011

Easy as 1 2 3 4

          Building a framed raised bed of most any dimension is easy. The one we are using today is 4' x 8'. We used three 8' L x 10” H x 2”W boards, cutting 1 in half for the end pieces. Notice we screwed the boards together “end on”. This made the exterior dimension of the frame 48” versus placing both end pieces inside the long rails, which would have created a 48” interior space. Truly personal preference.


This unit is being used as a "jello mold" for soil at the CASA garden off of Bob Wallace. The soil in this area is only 2" – 3" deep with limestone gravel underneath. When you can't dig down, grow up.

Removing the top layer of weeds isn't absolutely necessary, but it was a glorious morning and it took about 3 minutes to using a broad hoe.
        Leveling the frame and removing the top layer of weeds was quickly done. It isn't perfectly level; there is a piece of concrete under the middle of the back rail that could not be removed without compromising the fence.
The key to weed control is an underlayment. We prefer cardboard in this situation but there was none on site today just newspaper, so we placed newspaper in the bottom, at least 8 sheets of paper thick to smother new weeds and to help keep Bermuda and vines from running under the frame.


On top of the paper we placed leaf mold from the City's leaf pile. We have no extra soil to use on this property; in fact we make soil to keep the gravel covered. We used three 8 cubic ft wheelbarrow loads to fill the frame. That is just shy of 1 cubic yard. ( 27 cubic feet) Then we added one 8 cubic foot wheel barrow load of compost on top. The bed is over filled now, but with a good soaking this mix should settle quickly and be ready for planting soon.


Total time for this project (with materials on site) and while also helping direct volunteer gardeners was a little over 2 hours.

     If lack of soil or adequate space is an issue, consider this form of container gardening. This soil- less mix is essentially composting in place. You can use other mixes or topsoil to fill your framed bed. This is a low cost way to start gardening on a small scale yet grow an amazing amount of food over the course of a year.

The best time to start a vegetable garden is right now.

Sunday, June 12, 2011

Potato Boxes

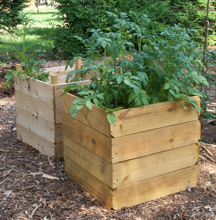
Space is at a premium here in our micro suburban homestead. We love growing potatoes particularly in leaves and soft materials. This year we decided to go vertical. Gentlevoice found some plans for potato boxes online and of course I modified them just a little.

Using fencing boards and 2” x 2”s, the original plan called for the 2” x 2's to be 4' long in each corner. I did not want to look at that sticking up for weeks on end, and I consider the stubs to be safety hazards, so I cobbled together these frames. I offset the 2” x 2”s to allow for stacking. Each 2” x 2” is the 6” long and offsets to the board by 3 “.

I set potatoes on the ground and covered them to the top of the 1st board with soil and leaves.

Stubs up at the back,
down in the front,
doesn't it look better?
As the plants reach 12” in height I cover ½ of the stem. It took 3 weeks before I needed to add a level to hold the additional mulch. However I needed to add the next level the very next week. This setup is 5 weeks old; I was very late getting to this.
There are claims that it is possible to grow up to 100 lbs of potatoes in this set up. We will not come close to that this year for several reasons. First, the late start cost me precious growing time. Second, I chose a German ButterBall potato which is very small; this potato weighs a few ounces, nowhere close to an Irish or other larger growing variety. Lastly I think I have made a mistake. I used leaf mold enriched with manure instead of just leaves with the last “fill up”. Not a best practice for several reasons. I may have heated the pile with compost instead of simply providing a growing medium. One of the stacks has wilted in the last few days, whether it is blight or I overheated the stack remains to be seen.

Time for at least one more box,
maybe after the worst of the afternoon heat!
I held off on this project for several years because it just did not seem cost efficient. These stacks of boxes cost $ 12 -15 each for materials. You can buy a lot of potatoes for $15. However I hope these will last several years possibly, much longer. I also like the idea of another place to compost in place or store leaves.


We will update this when we harvest the remaining plants. If it doesn't work this time we will try again this fall or next spring. Again at worst we have made compost at best we have a space saving technique for growing taters.

Sunday, February 6, 2011

Cheap? Repurpose? Grow Food!!

We at Foodscapes will be happy to create a more elegant solution to your 4 season issues. The following are some quick, easy and relatively inexpensive solutions for seed starting and row covers for young tender plants. These season extension tools can help you put food on the table earlier in the year and farther into the winter.

This is our bed bed. This is a re-purposed frame from one of those high dollar air beds. We made a lasagna garden out of it last year or the year before, I forget now.

The arches are 1/2” conduit bent to a 4' diameter. The conduit comes 10' long and runs around $2.20 per stick.


The rope that is somewhat carelessly tied to the arches is to hold the plastic up to allow better access when working with the flats or transplants in the ground as the case may be. I am using clothes pins to hold the plastic up and out of the way.


This plastic is the good stuff. 6 mil UV treated clear greenhouse grade plastic 10' wide x 100' long before being cut to length for this project. I caught this on sale last fall. It is rated for 4 years of continuous service. We will only use it on a seasonal basis so hopefully it will last many, many years. Please note for 6 years we have used a good grade of contractor plastic which costs much less. We usually get 2 years of service out of the contractor plastic. By keeping the unused portions out of the sun, a roll can last a long time. The contractor plastic is opaque and does block more sun but again it is an inexpensive way to cheat the seasons.

The bed was already in place but needed weeding. I placed the bent conduit arches in on each side and pushed them in to the soil about 6” - 8” or so. In a longer run or row set up I could add a purling made from conduit and fastened with self tapping screws. There simply is no need for that with such a small structure. I measured twice and cut the plastic, draped it over and looked around for hold downs (sand bags, pots, bricks and a landscape timber). I purposely chose these materials to show this doesn't have to cost an arm and a leg to do. Sod staples, tent pegs would also work well. With a wood sided frame some cardboard or batten material and a staple gun could hold one or two sides.

The rope that is somewhat carelessly tied to the arches is to hold the plastic up to allow better access when working with the flats or transplants in the ground as the case may be. I am using clothes pins to hold the plastic up and out of the way.

The plastic teepee.


Here are some pictures from our early square foot gardens. I simply bought some ¾” plastic pipe cut it to fit inside the boxes. By placing the ends in the corners I avoided the need for brackets. Brackets can be bought or are easily made we chose to do without. We crossed the pipes and tied them together in the center and they lasted all winter. We used this technique with these beds for 3 or 4 years before the beds moved to another house to help our son get started gardening.We used the contractor grade plastic and dreamed of the good stuff, all the while cheating the seasons with early started vegetables.

Tuesday, January 11, 2011

Planning Time--Planning this years garden

Location, Location, Location,


Avoid planting near or under trees. Start by looking for an area or space that receives at least 6 hours of sun. 8 hours of direct sun or even more is ideal. The Summer crops or Fruit producers like squash and tomatoes need at least that much light to really perform close to their ideal yield. For Leafy crops, early spring and mid spring produce, we can get by with partial shade or 6 hours of sunlight. As we move into late spring early summer, we use the shaded portions of our property to increase the growing period for lettuces and greens, often into June.

All the books say to locate your garden in a fertile, well drained location. Here in Alabama unless you have already composted in place over the area that will be this years garden you probably have an infertile area. With our highly compacted urban soils many sites are poorly drained as well. Which is why raised beds are so useful to the gardener compared to the farmer. Try to choose a relatively level area. A south facing slope warms faster in the spring and receives a little more light each day.

An additional consideration is access to water. Try to place your garden near a water source.

One thought that is usually missed in these generic discussions is too look for what your site can grow well. If shade is an issue then you may be blessed to grow greens longer into the growing season. If shade is an issue, think in terms of shade tolerant, even shade loving, plants. Learning the “genius” of your site is a big part of understanding the puzzle. Learning to build soil whether in heavy clay or sand is actually the real challenge. Putting as many factors as possible on your side certainly makes gardening more fun, productive and ultimately less expensive.

We will improve the soil - over time. Start with a soil test for the potential area. Boxes are available at the Cooperative Extension Service office near you. You can pick up the appropriate form at the office as well or you can go to Home Soil Tests for complete instructions and save yourself a trip the Extension office.

Next comes the fun part, List your favorite vegetables. Identify the vegetables you really love to eat, or have difficulty finding in the stores. See our list for a memory prompt and ideas.

You can plan for the entire year,( recommended ) or you can plan what you are going to start with, over the next few weeks. Here's how we graph our gardens. Graphing your potential area really makes a difference in maximizing potential yield and minimizing maintenance related issues. To start out use a different sheet of graph paper for each season of the year. It will be much easier to keep up with.

Start Small. Gardening is much more enjoyable if you aren't overwhelmed. Master a small space or spaces, learn to grow a few plants really well and expand the garden a little each succeeding year until the garden is just right for you. One advantage to expanding each year is the opportunity to compost in place where next years addition will be. Building the soil in advance is a great way to improve yields.

Sunday, January 17, 2010

Reading in the Rain

It's raining, so it's time to read!   I've got a couple of new good ones (new to me) on my desk. 

Container Gardening for Health has great tips on growing the 12 most impacted veggies.  The ones we love, but also the ones that get the most pest/herbicide buildup grown by industrial agriculture.  Get the book, find some dirt...and grow your own healthy veggies!
We are both cancer survivors but not quite food purists, figuring we are a bit old to have it help much.  We are, however, quite pushy about children's food.  Please, start the kids off right.


Easy Gardens for the South is really local.  Our own Harvey Cotton and the renowned

 Barbara Pleasant who spent many years around here offer up great tips and information on lots of plants.  "The Cultivator" really likes the information presentation.  He says it really is a useful book.  Buy one for yourself and see!